Friday, January 15, 2016

SC Flood and DIY Dryer Balls with Essential Oils

Our great state of South Carolina experienced a thousand year flood in October. Of course meteorologists predicted that there would be a lot of rain. But who really ever puts much stock in that?!......Welllll, let's just say their predictions were correct this time.

We live about 30 minutes outside of Columbia, and we never thought we would be affected by flooding.

My husband woke me up around 8:15 on that Sunday morning saying, "Babe you won't believe this rain. Come look!" This guy was sooo excited! We had never seen anything like this before!

 These pictures of our backyard were taken at 8:30 am. Like a child on Christmas Day!


This was a one-hour difference. These were taken at 9:30 am:


And that's when it started to get real. It continued to pour and pour and pour some more. Needless to say, his excitement was no more. I kept asking him, "What's our plan? What are we going to do?"   
We thought we could do something to prevent it from coming in the house. HA!! Yeah...right!

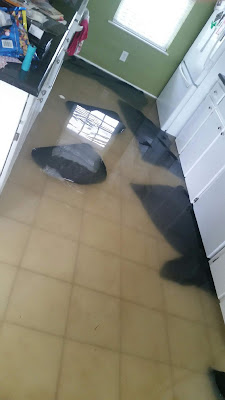
These were the last pictures we took before grabbing some things and leaving to go stay at my parents' house. We threw out every towel we had in the entire house. I know. Good one. Like that would really help. 

These are our rugs and towels floating around. 
 
We had everything back in place, and our home was back to normal right before Christmas. With the mold and mildew, and dust from sanding the new walls, we knew we would have to wash every piece of laundry in the house. I had been wanting to make dryer balls with Essential Oils for a little bit at that point and had even already purchased the yarn to do so. Knowing how much laundry we would have to do, I decided it was the perfect time to make the dryer balls. I followed the instruction here to make them. She has lots of great ideas on using Essential Oils!


I threw out my dryer sheets and have forever replaced them with dryer balls! These dryer balls have significantly decreased our drying time which is what I really love about them! Less drying time = lower energy bill! These balls will also last years. So, there's one less thing I have to buy at the grocery store. #win #ihategroceryshopping

Here's more on the benefits of using dryer balls! 

 I made a ball with the yarn, stuffed them and tied them off in old panty hose, and washed and dried them a few times to ensure felting. Then they were ready to go! Make sure you use 100% wool. Go to the Overthrow Martha blog link above to see pictures of the process. I followed those pictures step-by-step. I use Geranium, Lavender, and Joy on mine. I have also used Citrus Fresh a few times. I put about 3 drops on each ball. After drying a few loads, you will want to reapply some oils if you want a light scent. What's neat is that you can change things up each time. Use Lavender on a few loads, then Joy on a few, or none if you don't want a scent (like when washing your husbands' hunting clothes...smh). I use all 5 balls in my dryer, but you don't have to. Some people only use two or three. Our dryer takes forrreevveerr, so that's why I use all of mine each time. 

Click here if you want to purchase your own Premium Starter Kit which includes 11 oils, a Diffuser, and samples of other goodies. This is the best deal if you are wanting to get started with Young Living Essential Oils (only the best oils in the history of ever...duh!).

Wednesday, January 13, 2016

DIY Lip Balm using Essential Oils

Two years ago, one of my students' parents gave me some homemade gifts as Christmas presents - one of which was lip balm with essential oils. At the time, I had no idea what essential oils were, but I DID know that that lip balm was dabomb.com.

Fast forward two years. I got in touch with that parent, and she sent me the recipe she uses.

I made my first batch of lip balm with Young Living's Essential Oils over Christmas break. The recipe I used made about 24 tubes. To make yours you will need lip balm tubes (ordered from amazon), beeswax, coconut oil, vitamin E oil, pipettes (ordered from amazon), and essential oils of your choice. I used the same oils that the parent used in the one she gave me - 5 drops each of Rosemary, Peppermint, and Lavender.

The recipe is here!


Add some glitter tape, washi tape, or a cute ribbon, and you're done! Or leave some plain so the man in your life can enjoy. That's what I think is great about it - the smell, taste, and look of this chap stick is very neutral...there's no red color, strawberry/cherry taste to it.


Let me know if you're interested in ordering the best essential oils. Young Living offers the opportunity for customers to get 24% off all orders, simply by becoming a wholesale customer. There's no monthly fee or minimum, no obligations. By becoming a wholesale customer, you're also eligible for exclusive specials and promotions every month. 

As a wholesale customer you're also able to buy Starter Kits which is how most people (including myself) get started with essential oils. The Premium Starter Kit will give you the most bang for your buck. Here's the link if you would like to order your kit! My member number is automatically filled in so I'll know when you order and can help you get started or answer any questions you may have!

Saturday, January 9, 2016

DIY Dry Skin Sugar Scrub with Essential Oils

I made a sugar scrub with essential oils to give as gifts to some friends and family. I read through several different recipes and decided to go with this one. It calls for 1 cup of sugar, 1/2 cup of organic coconut oil, and essential oils of your choice.

I decided to use Lavender and Eucalyptus. I used Lavender because..well, because it's Lavender! Who doesn't love Lavender?! It's relaxing, calming, and helps dry skin. I used Eucalyptus Globulus because it's refreshing and is good for sore muscles.


Here's all the ingredients needed for this sugar scrub:


I found the cute red glass jars at Target - they came as a 3-pack.  The recipe was enough to fill the 3 jars plus a little left over for me! This took no time to make. I used the sugar scrub on my feet, but it can be used anywhere that's dry. Just scrub it on your skin, let it sit for a little bit, then rinse off. Soft skin for days! I will definitely be making more in the Spring when it's flip-flop-wearing time. Wait..what am I talking about?! It's South Carolina. Flip-Flop season is year-round!  After all - it was 80 degrees here on Christmas!!

Let me know if you're interested in getting started with Essential Oils! I'm so glad I did!

The BEST Face Wash..and it's DIY!

My husband asked me to make travel-sized face wash for him to take on trips. Yes, this face soap is that good! I made some yesterday for the two of us and to give to some family and friends. I followed the same recipe I used before, but I added Geranium this time to a couple of bottles to see how I liked it.


You can find info on the first batch of face soap I made for my husband and I here. We started using it at the end of July, and we are just now finishing it up, so I will be making more soon in a regular sized bottle. Our skin has never looked or felt so good. We love it and have often said we won't be buying store-bought face wash again.

I did not have Geranium the last time I made it. Click on the image below to read about some of the  benefits and uses of Geranium.


I filled about 1/3 of the bottles with Pure Castile Soap in Lavender. I then added 3-4 drops of oils (2 Tea Tree, 1 Frankincense, and 1 Geranium) and filled the rest of the way with distilled water. That's it! 


Disclaimer: This information is not meant to diagnose, treat, cure, or prevent any disease. The information represents what I, an Independent Distributor of Young Living Essential Oils, have chosen to do to change my lifestyle and personal health. Statements on this website have not been evaluated by the Food and Drug Administration.

Saturday, September 19, 2015

Witnessing Student Growth...#winning

As I have written about before, this year I am implementing Standards Based Grading. Here's how it looks in my classroom:

Students take quizzes often. Usually, there are 2-3 skills on a quiz, but each skill is separated. Here's an example of a decimals operations quiz my 7th grade general classes recently took.

Multiply & Divide Decimals Quiz 

Students get a score for each specific skill, and this is what goes in the gradebook - not the overall score. Since there's just a few problems for each skill, I have decided that mastery is missing 0-1 problems. If a student missed  0-1 problems, then I don't require them to re-quiz. If they miss more than 1 question, they are required to re-quiz on that specific section. I give re-quizzes on Friday. Students that do not have to re-quiz are given game time on their Chromebooks. They love this incentive!!

I am LOVING this way of grading. It is holding students accountable for their learning. If they don't master the skill the first quiz, they know they have to re-quiz on it on Friday. And if they still don't master it the 2nd time, they know they will be re-quizzing again. I have only had about 10 of my 100+ students that have needed to re-quiz a 2nd time. Most students are mastering the skill on their 1st re-quiz. This, to me, is such a win!

When settings up their interactive notebooks at the beginning of the year, I had students title 4 pages "Quiz Forms." After every quiz and re-quiz, students write in their score for each section of the quiz. This way, come Friday when it's time to requiz, they look there to see what specific sections they need to re-quiz on. Not gonna lie - this has been a struggle for many general students. I should have went around to every single kid after returning the first quiz to ensure they had done this correctly. I will definitely do that next year. Those who did it right the first time are okay. Others, not so much. I even saw this past week where one kid had glued in an actual quiz in the quiz form section. (Insert blushing emoji). I then tore the quiz out, and I went through and wrote in every quiz and score in his notebook. (Insert impatient/annoyed emoji).

I wish I had a picture of a notebook that was done correctly. I will take a picture this week and add it here.

My original plan was to make the quiz report forms myself and have the student just fill in the score and glue them in. I did that for my first class, but I just had my other classes hand write them in. Maybe I will start creating these for general classes.

Many of my advanced students are making careless errors on their quizzes...forgetting a negative sign, adding when they were supposed to be subtracting, etc. Making them re-quiz because of these mistakes forces them to be more and more careful with each quiz.

Re-quizzing has definitely allowed me to see student growth and has helped me to also identify weaknesses.

After classes have taken the 1st quiz on a topic. I grade them and sort them low-high. The following day, students work with a partner on making corrections. I do not grade the corrections. It is just for their learning. I take a quiz from the top of the stack (a low score), and a quiz from the bottom (a high score). The two students get together, and they know that if they have the high score, they have to actually teach and help the other student - not just show them their answers. This has been so beneficial! I hear the "ooooh, I see what I did" and "man, I can't believe I forgot that."
((music to my teacher ears!))

Friday, September 18, 2015

My Daily Routine Using Essential Oils Since Starting School

I started using oils in May, and I really didn't know what I was doing at first. Now, in September, I absolutely love them, and wish I would have known about them sooner. I order something new every month...I only wish I had more time in my week to play around with new recipes, products, ideas, etc.

I wanted to share my oily routine since school has started.

I know a lot of people diffuse peppermint and/or lemon to help wake them up, and get them focused and energized. Being real - I don't wake up in time to diffuse anything. I will apply a little Frankincense, Melrose (a new one to me), or Tea Tree if I have any blemishes on my face. I also always keep a pitcher of water with lemon, grapefruit, and peppermint in it. If I am literally running out the door I will just grab a bottle of water (told ya - the struggle is real). But if I have a minute or two to spare, I will fill my glass water bottle up with water from my pitcher.

I have taken my bottle of Stress Away with me to school a few days and rubbed some of my wrists. 

Often times I leave school with tension headaches. When I get home, I diffuse one or a combo of two of: joy/peace & calming II/stress away/citrus fresh. A recent favorite of mine to diffuse is citrus fresh and joy. It is uplifting and smells SO good!


I have been sick this week, so I applied thieves to my feet. I also used RC on my sinus areas. 

I apply Progressence Plus (specifically for women) nightly to my neck and forearms. 

Young Living Essential Oils are also in my face wash, makeup remover cloths, and face cream that I use daily. **Note: Tim (hubs) says that's the best face wash he's ever used!! And I agree. I will be making some to give to some of my family soon.

I will diffuse peppermint on the weekends when I don't feel like doing..well, anything. This helps me stay alert and keep me focused on writing lesson plans, creating quizzes, entering grades, customizing homework, cleaning the house, doing laundry, etc.

I have been out of Purification for almost 2 months, and it.is.killing.me. I also use it on blemishes, on cotton balls put in smelly places, and in my diffuser. It is an air purifier and literally takes odors out. It's been out of stock. I have learned my lesson though. I will start buying extra of the oils that I know I use a lot and don't want to be without again. I am also getting another diffuser to keep at school with  next month's Essential Rewards order...that way I am getting points back to use on future orders! Win-Win

On another note, it's starting to feel more like fall here in SC! And that means Carolina Football is in full swing. WooHoo!


Sunday, August 23, 2015

First 3 Days of School

I should definitely be writing this week's lesson plans right now, but obviously, I'm not. I can't believe I'm already procrastinating.
pssshh. yeah, right! I wouldn't expect anything else.

We started school this past Wednesday. Like all teachers, I stress procedures those first few days. However, I also really want students to have fun and enjoy being in class. I want them to leave my room excited about what they're doing in math. That's half the battle. If kids know that you (gasp) actually like them and if they enjoy being in your class, they're more motivated and more likely to work hard for you. So, I tried to make those first three days a mix of learning procedures and having fun.

Day 1 - Wednesday:
When students enter my room the first day, there is a small tub of Play-Doh on their desks. The first thing I have them do after welcoming them in is use the Play-Doh to create something that represents them. They LOVE this. It It's so out-of-the-norm for them to be able to do something like this at school, so they are typically pretty excited and chatty during this time. That's okay. That's what I want to happen. I give them more time than actually needed for this because I use that time to walk around to each group of students and talk to them. I ask questions, figure out if I've had their siblings before, find out who their 6th grade math teacher was and what level math they were in, find out what they did over the summer....basically anything to get them to open up to me so that relationships can start to form.

Then I go over a "Who is Mrs. Brown?" powerpoint to introduce myself. It just has pictures so students can see that I'm more than just their math teacher.

The next thing I do is spend some time going over just 3 procedures that they will need to know for the following day - Supplies, Beginning of Class, End of class. I save the rest for the next day.

If there is time left, (and this year there was),  we play a name game. Each student has to think of an adjective to describe them that starts with the same letter that their name starts with. For example, it could be Smart Suzie, Sassy Suzie, Lovely Liz, etc. The first student says their adjective and their name, and then the next student has to say theirs and everyone that's went before them. The kids like this, especially when I split the class in half and make it a competition, but it is mainly more for me to help remember names.

Day 2 - Thursday:
I finish procedures on the 2nd day. However, instead of me just using a powerpoint and rambling on about them, I want the students to interact with them. I printed out the powerpoint that I use, and put 1 copy on each group of desks. Students rotate reading them aloud in their groups. I include written descriptions of important procedures and memes in the powerpoint!! They LOVE reading the memes aloud! My favorite to hear the students "act out" is the "ain't nobody got time for that" one.
TOO FUNNY!

After they've finished reading in their groups, I give each student a half sheet of colored paper, and they have to write down two things they learned about homework, late work, rules/consequences, and rewards. Then I call on students to discuss what they learned.

Once finished with procedures, I have them work on covers for their interactive notebooks. I go around the room and let students choose which color paper they want. They are allowed to decorate it however they'd like. This week, we will begin taping their covers to their interactive notebooks with packaging tape. This helps to personalize the notebook to them so they will (hopefully) find it important and be more likely to keep up with it. It also makes the cover a bit more sturdy.

Day 3 - Friday:
We play Musical Chairs on Friday. This is really not a game. No one wins. No one gets out. It's just the  name of the activity. I got this activity from the teacher I student-taught under. I knew I would love it.

I created 15 get-to-know-you type questions. I put 1 card on each desk. When the music is on, students flip their cards over and answer the question. When the music stops, students rotate to the next desk.

After Musical Chairs, students finish their notebook covers, and I pass out workbooks.


What do your first days look like?